This chicken coop is simple and easy to put together. In showing you how we built our coop, I hope that it may inspire and help you know that you too can build a coop with what you have on hand or what you may need to build one.
How to build a simple DIY chicken coop

I never thought I would want chickens. Never really had a desire to have them, especially after I had chickens fly at my head when I was in 6th grade, while trying to collect eggs at a friends house. After that experience I swore I hated them. But then things changed. We bought our first house and having a piece of land all your own, to do whatever you want with it, opens you up to all kinds of ideas and possibilities.
I knew I didn’t want to buy a chicken coop. I hadn’t seen one that I liked the look of or the price tag of. Mine and husbands past building endeavors made me think we could do this all on our own. If we could build a goat shelter and a hay bale holder, we could most definitely build a chicken coop.
Building the Coop
When we moved on to our property, the barn was full of wood that the previous owner had collected. It was a huge stack of lumber, all shapes and sizes. So we set off to rummage through it to find good, usable lumber. We wanted the coop to be 4 feet wide by 8 feet long and 6 feet tall on the sides, with enough peak height so my husband could fully stand up inside it. Luckily we were able to find just what we needed.
First we started by making the frame for the floor
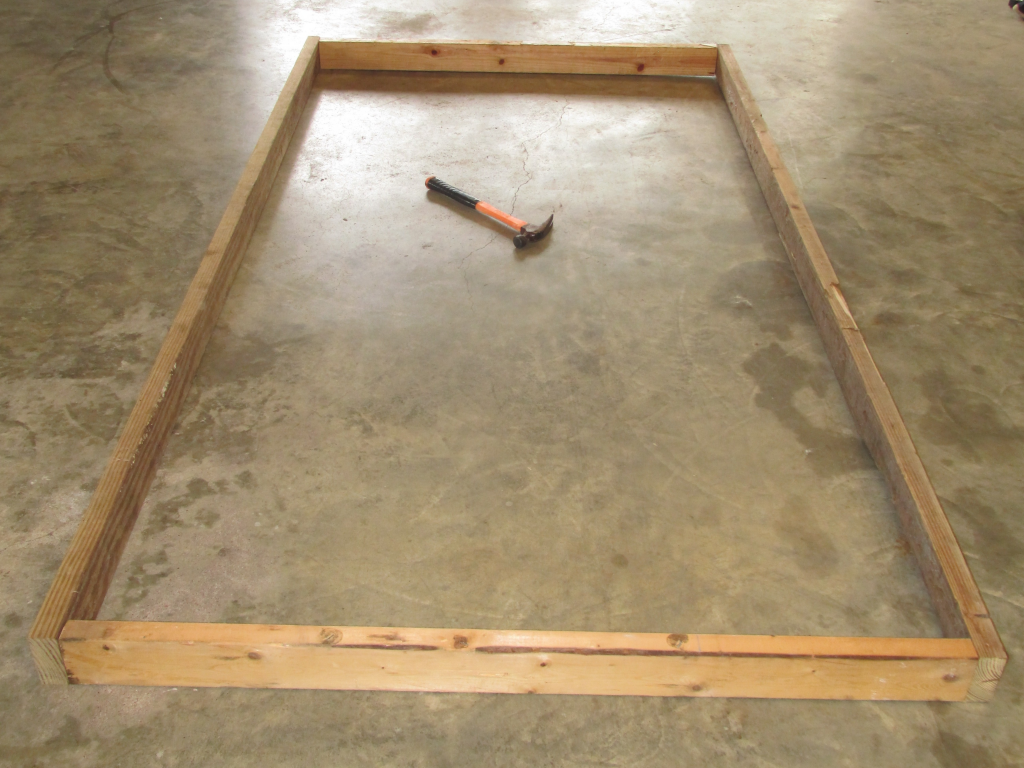
We cut two 2x4s to 4 feet and another two to 8 feet. Then we fastened them together with 2 inch general purpose screws. We did not predrill the holes for the screws, but you may if you want to insure there will be no cracking.

Next we cut six 6 feet long 2x4s to make the corner post. Yes I know a rectangle only has four corners. The other two boards will be used as part of the door frame.

We stood the 2x4s up and screwed the four corner boards to the inside of the 8 foot long floor frame boards. Make sure the 2 inch thick sides of the boards are facing the front of the coop and the 4 inch widths are laying flat against the 8 foot floor frame boards.
Then we took the two remaining 2x4s and stood them flat against the 4 foot floor frame boards, making them butt up against the boards we just screwed in. At this point you should have 2 L shaped corner boards in the front of the coop and single 2x4s at the back.

Now the Coop’s ceiling Frame
After making the corners of the walls we made the ceiling frame, which will be a mirror image of the floor frame. You will need two more 4 foot boards and two 8 foot boards. Then screw these boards to the outside of the vertical corner boards we just installed. Now you should have a 3D rectangle box.
To stop any twisting of the frame and to give it more strength, we measured the space between the two 8 foot boards on the ceiling frame. Then cut a 2×4 to fit snuggly in the middle of them, stretching from one side to the other.
Here comes the roof Frame (Rafters)
Now is the more challenging part…. figuring out the pitch of the roof!
Before that step though, you will have to decide how much over hang you want for the sides of the roof. I wanted ours to hang over enough, so when it rains, the water will run off and drip far enough away from the sides of the coop.
The good ol’ pitch..
After you have decided the over hang, now it’s time for the pitch. I wanted the peak of our roof to be pretty high and to have a nice steep slop. We did not use a special tool or any specific calculations and formulas to figure out any angles. My husband and I literally became cavemen, grunting and groining at each other, as we took two long 2x4s and held them up to the corn of the ceiling frame, making them touch, until the pitch of the roof looked nice to us. We adjusted the pitch many, many times and lost the perfect angle many, many more times, because we lost grip while using our very precise and mathematically correct strategy. Power to you if you know angles and how to calculate for them. We are still learning!
Once the boards were where we wanted, we took a pencil and drew a line where they intersected. This was to let us know where to cut a vertical line, so they would sit flat against one another and make a point.

We took a screw and zapped the two points on the peak frame together, going down far enough to not split the wood. We did this in the front and back of the coop.
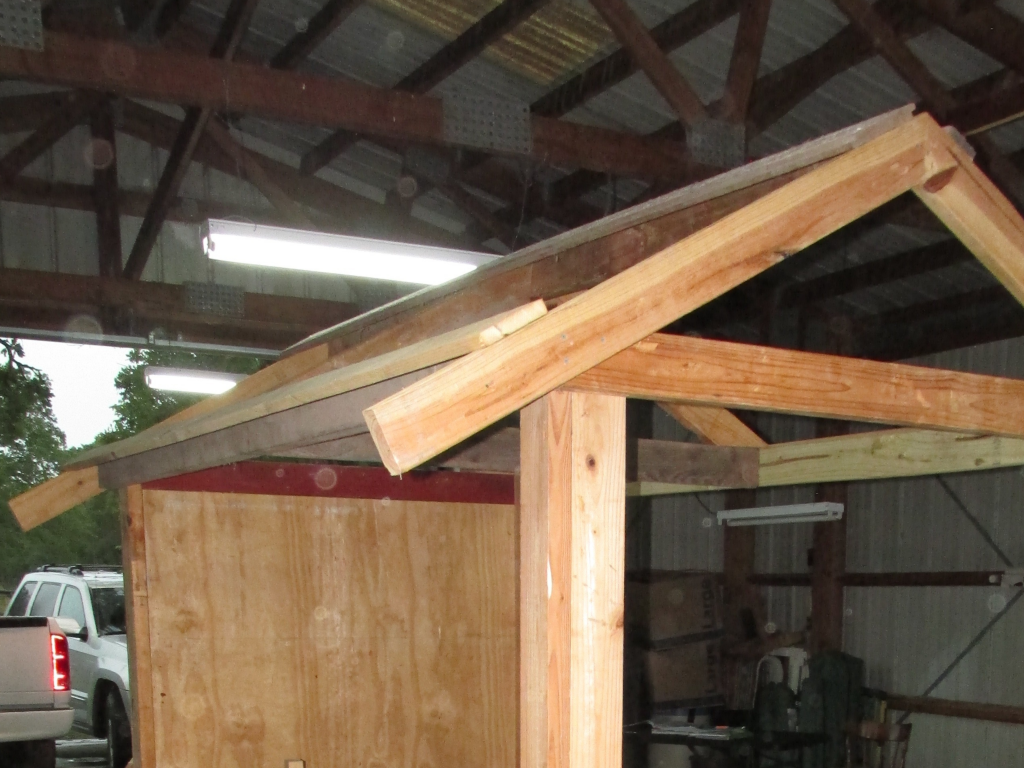
Lastly for the roof frame, you will need four 1x4x8s or any board that is thin and a 2x4x8.
First take the 2x4x8 and place it at the top of the roof peak triangle, stretching front to back and screw it into place.
The thin boards will be parallel to the board you just screwed in place. Take two of the 1x4x8s and screw them up toward the top of the roof near the peak. Then take last two and place them where the wall framing and over hang meet. You will use these thin boards to screw the roof onto later.
Nesting Box Platform
Now this next step is a, do as I say, not as I do, moment. Here you are going to install the nesting box platform, which will be a 3 sided box with a floor and open on the top and front.

-Platform frame-
Decide what the depth of this platform will be. We made ours 18 inches deep. That allows a 12 inch nesting box, with a 6 inch walkway in front of the boxes for the chickens.
Now that you have your depth decided, you will need two 2x4x6. This will be used as a support for the nesting platform. Go ahead and stand this board vertical, attaching it to the bottom floor frame and the ceiling frame, however many inches away from the back of the coop you chose. In this picture you will see how we did not add a full length board, only a half board from the ground to the level of the platform. We later go back and add an additional board to make it span the height of the coop.
Next you will need two 2x4s about 4 feet long, that will stretch across the back of the coop and in front of the nesting boxes, almost making a rectangle frame. This will become the platforms floor. It should have two open sides, to the left and right, at this point.
On the sides that are missing, you will need to cut two small 2x4s, whatever size you chose for you depth of this platform. Screw them between the 2x4s you just installed and the corner 2x4s. Now you should have an elevated rectangle frame.
-Platform Floor-
Now add a plywood floor to the platform frame you just created. We had a bunch of plywood scraps we took out of our house, that we were able to use for this step.
After the floor, we measure the back opening and cut a piece of plywood to fit. I wanted the back to be fully enclosed. From the outside, we zapped the plywood into the supporting frame. Then measure and cut plywood for the sides of the nesting box platform. Also figure out at this point if you want to close up the triangle at the top of this section with plywood or wire. We chose to use plywood.

I decided to paint the whole thing with some extra paint I had on hand. I did not want to worry about getting paint on the wire later. At some point I will need to go back and repaint it all with exterior paint.
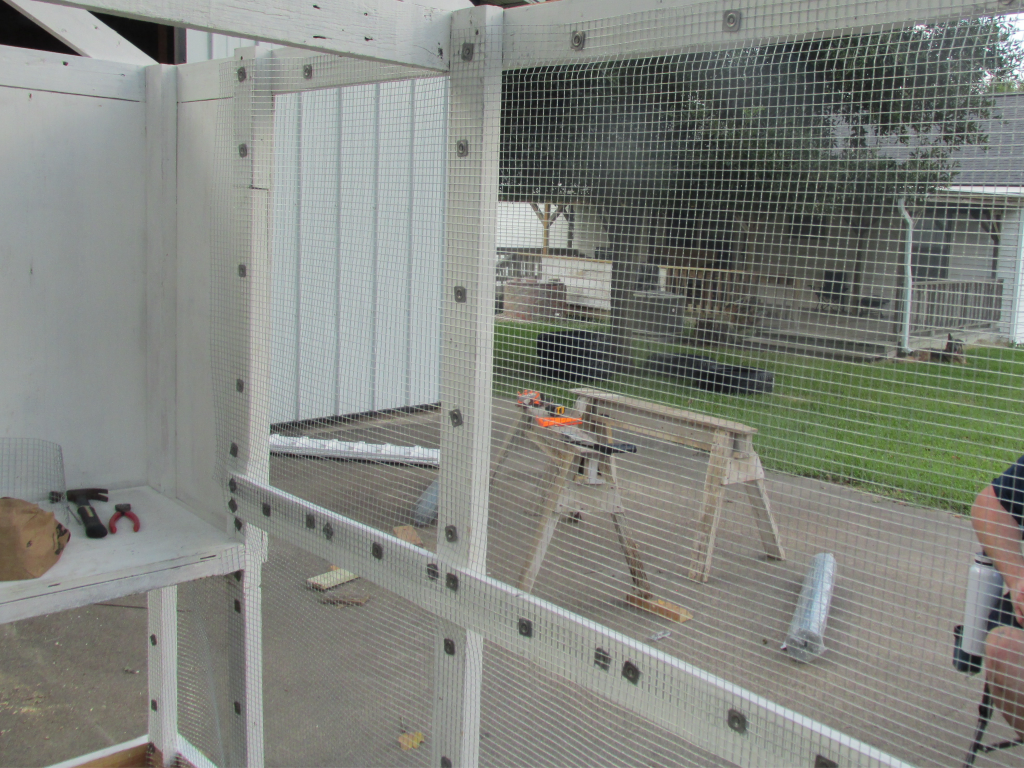
Now comes the wire
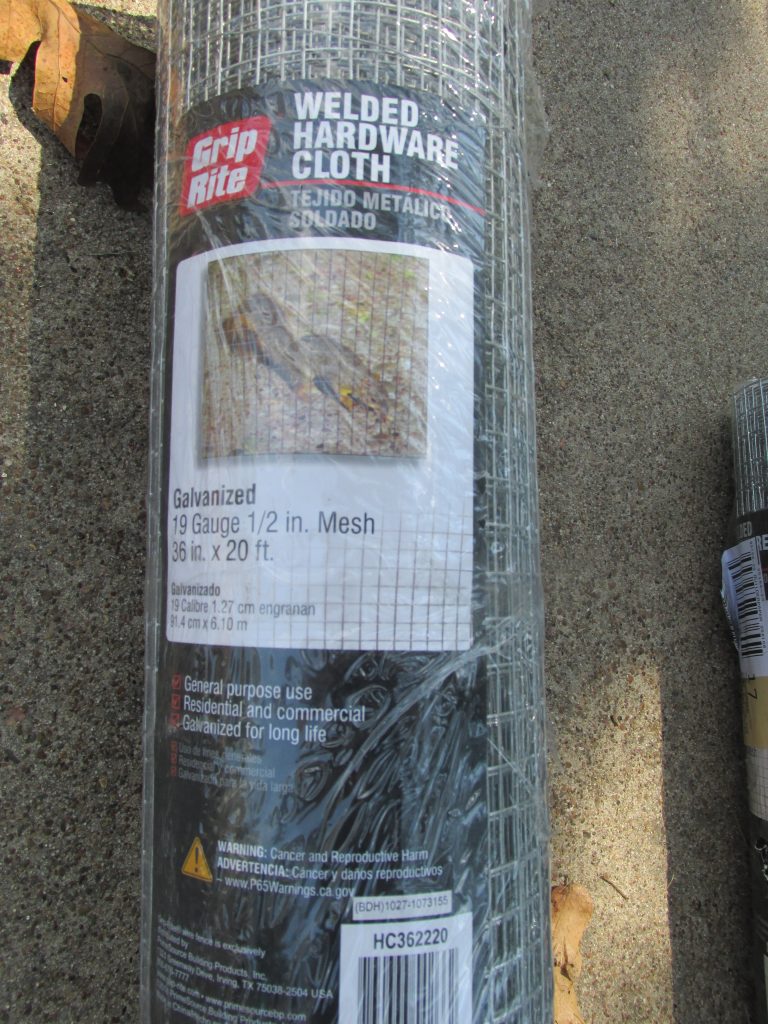
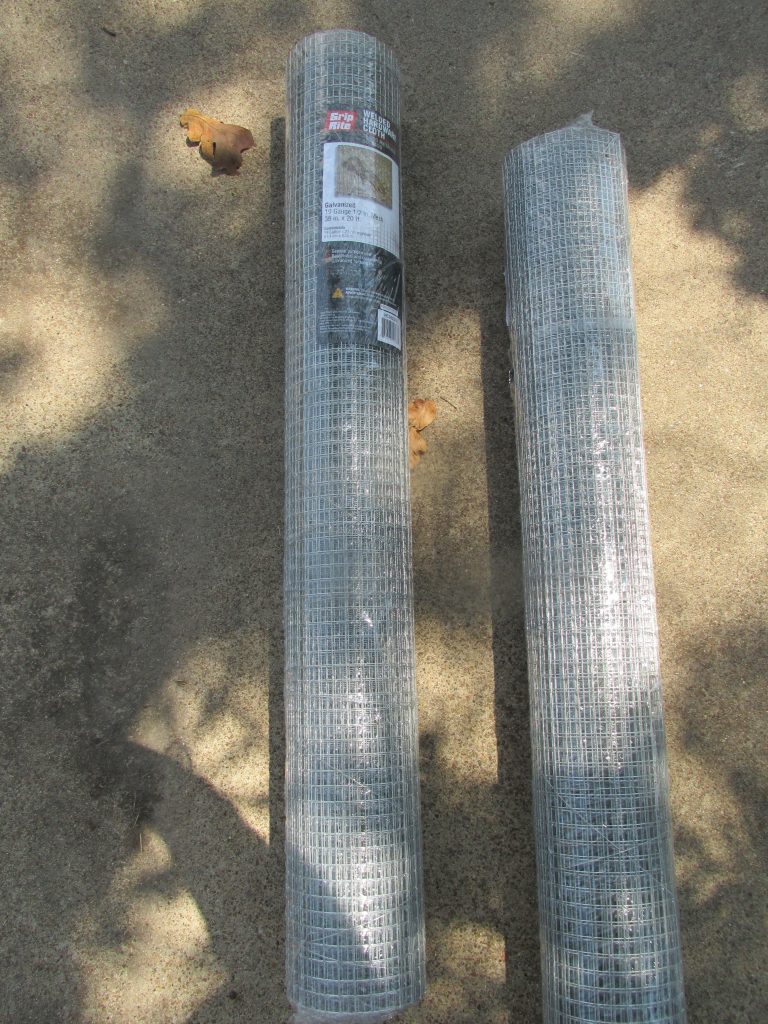
*Word to the wise, MAKE SURE YOU HAVE GLOVES ON! This stuff is very sharp. We all made the mistake of not wearing long sleeves, so I suggest that too. This is the stuff we bought from our local hardware store. This hardware cloth was $31.99 a roll, which was the cheapest we could find for the quantity we needed. We bought two rolls for $63.98.
We decided we would roll this out going horizontal. In order to do so, we had to attach one last board to the inside of the coop along the sides, from the front corner to the nesting box section. This needed to done for the wire to be strong and secure.

We attached the hardware cloth to the wood using 7/8 square cap nails. We bought 2lbs at $2.19 a pound. It was very easy to use this type of nail. It holds the wire tight and you don’t have to worry about the nail slipping through the holes in the wire because the cap is plenty big enough to prevent that.


We stretched the hardware cloth as tight at we could. We did not want an gaps for snakes or any other creature to be able to get in. Once we had it tight, we just grabbed a nail and hammered it in. Easy peasy! My boys did the lower half of the chicken coop with no problems.
here comes the door
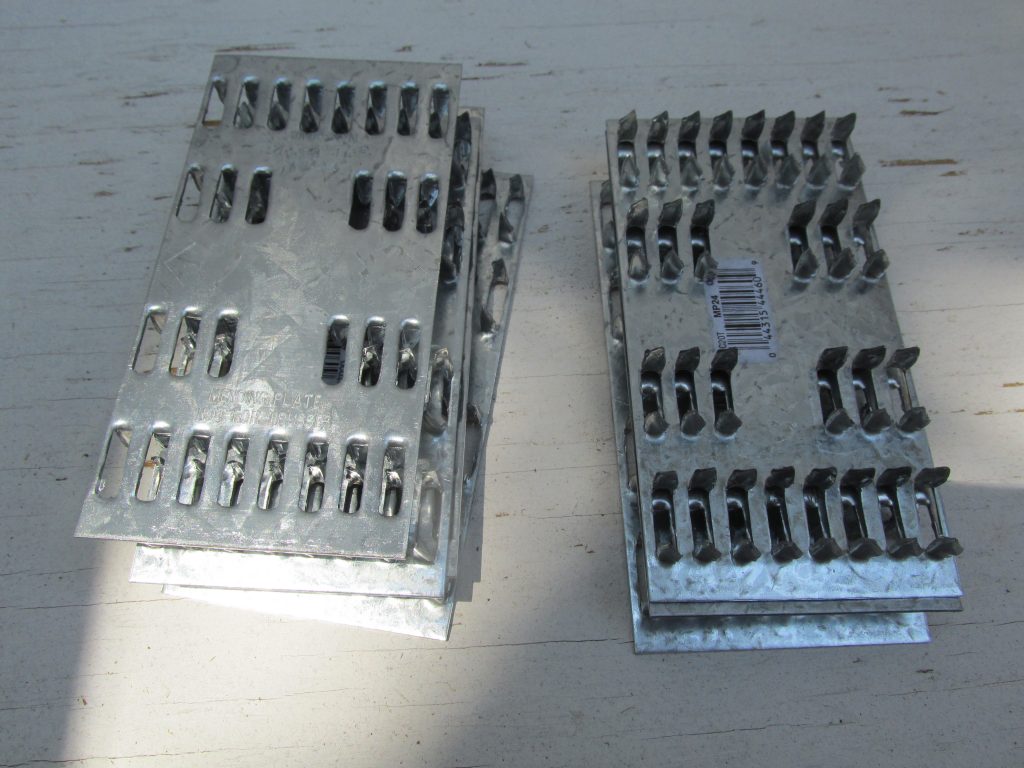
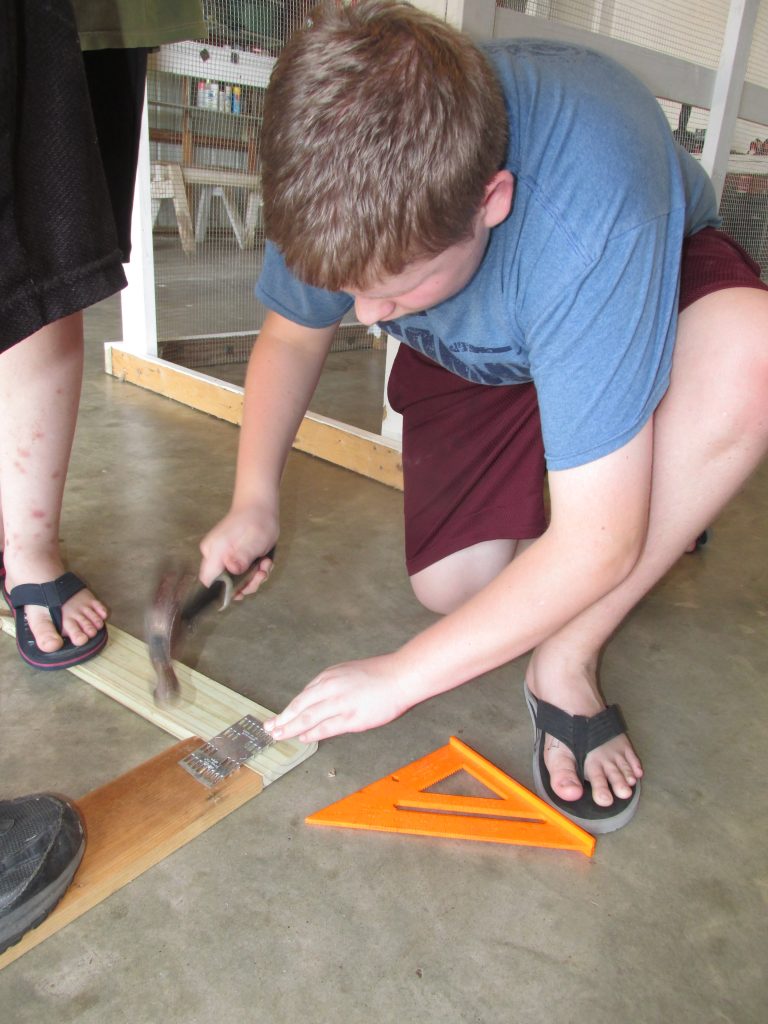
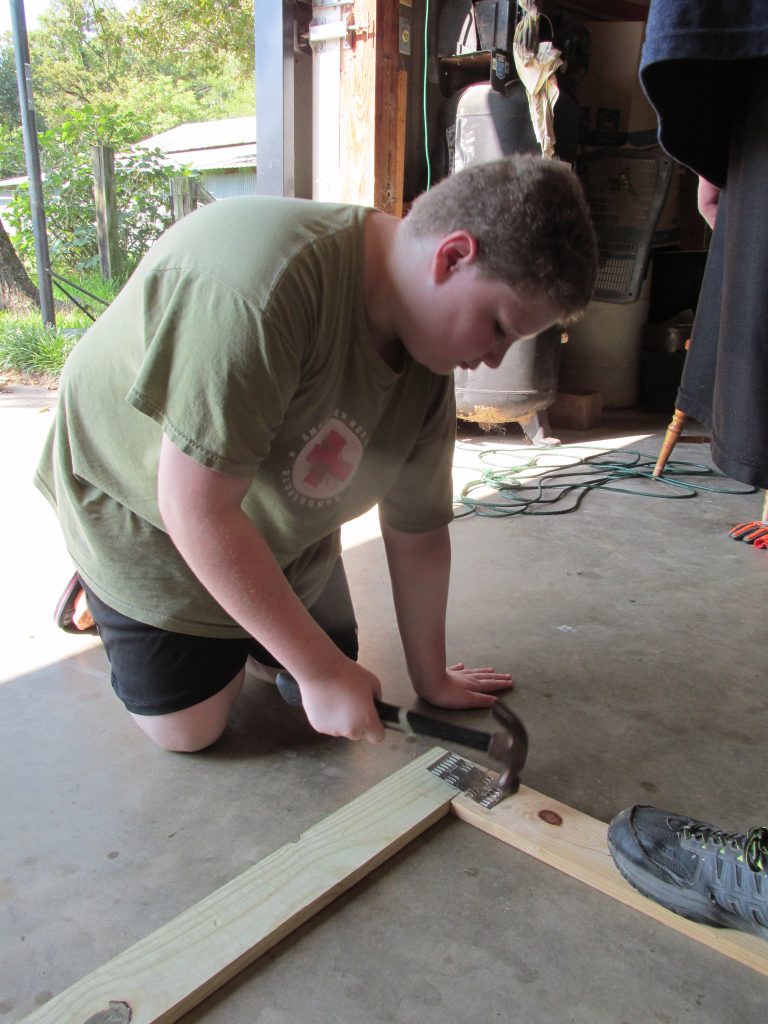
We wanted this to be super easy with not a lot of cuts and steps. My husband thought about using these mending plates. We have similar plates like this in his shop that hold the whole thing together, but bigger of course. Why not try them out and see if they can make this door building step easier?….Spoiler Alert: They did! We bought ten of them for $.69 each, totaling $6.90.
We simply measured the space at the front of the coop where the door was going to go, then cut the size of boards we need. My husband and I played around a little with the style of door, but I just wanted it done, so we kept it simple.

Once the door is laid out the way you want it, take a mending plate with the sharp teeth facing down, place it straddling the seam between the two boards and hammer it into the wood.
Make sure the door is square before hammering!
It will bite into both pieces of wood attaching them together. My husband placed a plate in each corner, front and back, then on the backside of the cross support in the middle.

Next just paint it whatever color you want it to be. It’s easier to do before attaching it to the coop.
Attaching the Door
To attach the door we bought a screen door kit that came with two hinges, a handle and a spring for only $9.99.

We used scrap wood to space the gaps in the door, making sure it was pretty equal all the way around. Honestly, in difficulty, this was probably right under finding the pitch of the roof, for us. Getting the door level and not catching on any side was quite the challenge on a nice, sweltering, Texas summer day.

Roof time
Now it’s time for the roof! Once the roof is done, the coop will pretty much be good to go and ready for chickens.

We had a pile of old corrugated metal sheets, that were left here, that we repurposed for the roof. Measure from the peak of the roof to the end of the over hang. That will be how long the sheets of metal will need to be for both sides of the roof. My husband used his angle grinder with a cutting wheel to cut the metal to size.
We used 1 inch self tapping screws to attach the metal to the wood roof supports. They were $5.89 a pound, but we only needed 1/2 a pound, so we paid $3.36.

Now you will screw the corrugated metal sheets onto the all the roof supports. Screw the sheets to the wood from the dips, not the raised sections of metal, over lapping each sheet a little.

Lastly, you will need to make a roof cap. You want the roof to be sealed and rain water to roll off the roof. You do not want it to go between where the two sides of sheet metal meet. All you have to do is make sure it’s long enough to reach from the front to the back and wide enough to drape a few inches on either side. Then screw it into place.
The Finished Simple DIY Chicken Coop


Since our chickens had been inside our house, I wanted them to spend a few days testing out the coop inside the shop. They were very happy to have more room to flap around.

All together we spent only $93.71 on this simple DIY chicken coop! This was definitely a win in my book.
UPDATE on our chicken coop? Click here to see!

Do you want to add wheels to your chicken coop? Read here to see how we did just that!
Watch Below to See how we added a nesting area for our chickens!
Take at look here at us finding Old shiplap walls!

Simple DIY Chicken Coop
Materials
- 19- Pressure Treated 2x4x8 = $166.63
- 10- Furring Strip 1x4x8 = $34.20
- 2- 1/2in 4x8 Plywood =$41.34
- 3- Corrugated Sheet Metal 8ft = $43.08
- 1- #6 2in Gen Purpose Screws =$4.99
- 1lb - 7/8 Square Cap Nails = $4.49
- 1/2lb - Self Tapping Screws = $3.36
- 10- Mending Plates = $6.90
- 1- Screen Door Kit = $9.99
- 2- 36ft 1/2in Hardware Cloth = $63.68
Notes
Total Cost = $378.96
* These prices our for my area of Texas. Lumber is priced higher at this time since the pandemic of 2020.
Very nice! I love it!!!!
Thank you so much!
How many chickens does this house? Sorry, if I missed that part in your blog. Im getting g four chickens. Would this be adequate room?
Yes ma’am I feel it would be a great size for 4 chickens. When we built this we had 6 girls.
Thank you for this design, we live in Florida so I really hoped to find something that would get great air flow. This design of yours will be perfect for us!
Thank you,
Sharon
I hope it works out for you! It definitely has plenty of air flow.
Purchases everything to build this and just went over instructions and materials list and realized the two plywood sheets would be for roofing and I believe you forgot to include an additional sheet for the nesting box surround only bc you were able to utilize scrap you had. Just commenting in case you wanted to update materials list and save anyone attempting this from a second trip to the store
Hi there! We actually didn’t use any plywood on the roof. We used only the tin and attached it to the roof frame. Plywood most certainly can be used under the tin roofing for stability or insulation purposes, we however just went in with straight tin.
Hi there!
I’m looking to build this coop using your plans and saw you put (3) 8ft sheet metals.. was the third used on the very top to cover where the two highest points touch? Did you only use one 8ft sheet on each side? It almost looks like there’s two sheets on each side of the roof, if so, wouldn’t you have used 4 sheets instead of 3?
I love this! But I’m new to chickens. Where would they lay their eggs? Also does it keep away from predators? I love in florida. I love this design.
Hi Laura!
I built three laying boxes out of some scrap wood. The boxes sit on top of the nesting box platform. You could build something or use wood crates tipped on there sides. I’ve even seen small plastic bins, like kitty litter boxes, used as nesting boxes. They just need somewhere semi private to lay with some bedding. The platform is big enough to accommodate some decent size boxes.
And as for the predators, we haven’t had an issue. We did dig and bury the bottom of the coop in the ground. So it’s not just sitting on the surface of the ground. We will be adding a floor soon, which then we will elevate with some concrete blocks.
How do the chickens stay warm enough in the winter with an open design like this? I do live in the South, but we get a few weeks of freezing temps each year.
We have plywood panels that we add to the sides in the winter time and remove in the spring. We are in southeast Texas, so winters are not too harsh here. They mainly need a wind and rain block.
How do you protect the ladies from the weather? We live in Florida and it rains an awful lot here.
I love this cute little design and the price tag even more BUT I am a little worried about hurricane season…
Hi Katie!
We have plywood panels that we add to the sides in the winter time and remove in the spring. We installed some latches onto the coop that secure the panels in place. We are in southeast Texas, so winters are not too harsh here. I wanted a simple way to protect them from the wind and rain, without having to permanently close in the sides, because the summers are scorchers here.
However, it would be real easy to use less wire and fill in the wire sections with plywood when building it instead. If you don’t want to use plywood, you could use some horizonal 1x4s or 1x6s to create a little shiplap moment.
I love you for this!
This is excellent! As a divorced mother, I wanted something simple and functional for my coop of 6 hens. This is perfect! Thank you for the thorough explanation and walk through of your coop!!
I’m glad this was helpful! I’d love to hear back from you.
Could you share a pic of your nesting boxes and how they fit on the shelf area? Thanks so much!
Hi! I just added a video down below of the nesting boxes we eventually added.
Where do the chickens roost?
Hi! I just added a short video to this post and in it you can see where we added roosting bars. They also use the rafter as a roosting bar.